OVERVIEW
Developers’ Guide to the UrbanHorn:
This guide will walk you through the stages of integrating your applications with UrbanHorn. It also goes through the basics of how the solution interacts with your business to improve user engagement.
Introduction
UrbanHorn is the most effective solution to send push notifications. It enables consumers' businesses to grow by allowing them to engage users through push notifications. It provides the functionality to integrate with your apps seamlessly. The platform enables your business to provide customers with a personalized experience. UrbanHorn enhances user involvement by introducing features like segments in which users are based on actions and run targeted campaigns in these segments.
Specifications
UrbanHorn is a platform that is backed by some outstanding features. UrbanHorn provides dashboard functionality to segment users based on their actions and profile properties and runs targeted campaigns to these segments. SDKs enable the customers to personalize apps by providing them access to user profile data.
Key Concepts
UrbanHorn is based on dashboards, users, segments, and campaigns; therefore, to proceed further, it's essential to understand the concept of each one.
-
Dashboard
UrbanHorn Dashboard enables you to manage your apps using Push Notifications. Get your application credentials (Team ID, Access Key, and Server Key) from the dashboard to launch the framework.
-
Users
At UrbanHorn, the User can be anybody who integrates UrbanHorn SDK. A user profile is formed for each person who links the app after the UrbanHorn SDK is integrated. The default fields in the UrbanHorn user profile include device and location. You may also customize the default user profile data model by adding new fields relevant to their business.
-
Segments
Users can create segments in UrbanHorn, which are groups of users whose actions or user profile properties meet a set of criteria that you have defined. Once a user has formed a segment, they can launch a campaign to target them.
-
Campaign
UrbanHorn campaigns communicate to a vast extent with your users. It offers a reliable communications channel for the maximum reach of your target users. The campaign tab on the UrbanHorn dashboard makes it easy to create new campaigns and see existing ones.
Getting Started
Follow these steps to install our SDK and access the UrbanHorn dashboard to get started with UrbanHorn.
Step 1: Integration
Connect your app with Uran Horn through an SDK Integration. Any of the methods listed below can be used to accomplish this:
- Android SDK
- iOs SDK
- REST API
- Flutter SDK
We'll start tracking specific predefined data points as System Events in your dashboard after you've connected.
Step 2: Register User
When you sign up for the UrbanHorn service, you will be provided with a unique access key found under User Profile in the UrbanHorn dashboard. UrbanHorn service is accessed by the access key.
Step 3: Setup
Configure push messaging to start engaging users.
User Attributes
User Attributes are considered as data points that offer a clear understanding of who your user is from and what they are, based on your business type. You can segment them into relevant and accurate segments and personalize campaigns sent as push notifications. To indicate when and what value must be given against each attribute, you'll need to call set functions from the UrbanHorn SDK.
We have set multiple generic user details to be tracked for all digital enterprises. Following this code snippet, you can change the value of these attributes for all of your users.
For Andriod:
For single value:
For values in array list:
For iOs:
For Flutter:
To set attributes follow the following code snippet:
System Events
System Events are predefined actions that are automatically tracked for your platforms once integrated with your UrbanHorn account.
| Event Type | Backend Name | Description |
|---|---|---|
| Push (Mobile) Sent | gcm_notification_response |
When UrbanHorn sends a Push Notification to the server for delivery. |
| Push (Mobile) Click | push_notification_click |
When a user clicks a Mobile Push Notification |
Campaigns
Synopsis
UrbanHorn offers a messaging channel that allows you to create engagement strategies to reach out to people with personalized messages at the proper time.
Campaign Example
You can create campaigns to send a push notification to targeted users with a one-time exclusive offer.
You can use our Campaigns feature through the dashboard.
Android
Getting Started:
Instructions for adding the UrbanHorn Android Mobile App SDK to your Android are as follows:
Requirements:
Here's what you require before you start using the Android SDK:
- An Android Mobile App that automatically supports Android devices.
- An UrbanHorn Account - App access key(available in the user profile)
- A Google/Firebase Server API Key
- Android Studio 4.0.0+
- The Android SDK supports Android API level 21 and higher
- Kotlin 1.4+
Supported Devices
The Android SDK supports Android API level 21 and higher. It is built for armeabi-v7a, arm64-v8a, x86, and x86_64 architectures.
Installation
The simplest way to use UrbanHorn in your Android project is with Maven. Add dependencies and ensure the following configuration is in your build.gradle file to install the Android notification SDK.
Push Messages
Push notifications, or messages that appear on mobile devices at any time, can be sent by app publishers even if the users aren't actively using the app or their devices. The default implementation by UrbanHorn is the simplest way to send push notifications. Simply configure FCM Firebase Cloud Messaging and start sending Push Notifications to your Android users.
Here's how it's done:
Step 1: Add Firebase
To add Firebase to your Android project, follow these steps.
Step 2: Add Dependencies
In your module's build. Gradle, add a dependency for Firebase Cloud Messaging.
Step 3: Pass Token
Pass Firebase token to UrbanHorn by using FirebaseMessagingService.
Java
To ensure that changes to the user's Firebase token are being sent to UrbanHorn, you must pass the Firebase token to UrbanHorn from onCreate of your Application.
Java
Step 4: Pass Messages
Pass messages to UrbanHorn by creating a class that extends FirebaseMessagingService. UrbanHorn included a key source with the value of UrbanHorn in all incoming messages.
Java
The next step is to add the service to your AndroidManifest.xml's application element as seen below.
XML
Step 5: Add Firebase credentials to UrbanHorn
To add your firebase credentials to UrbanHorn, follow this simple procedure step by step:
- To begin, go to the Firebase Developers Console and log in.
- Select your Firebase project to work on.
-
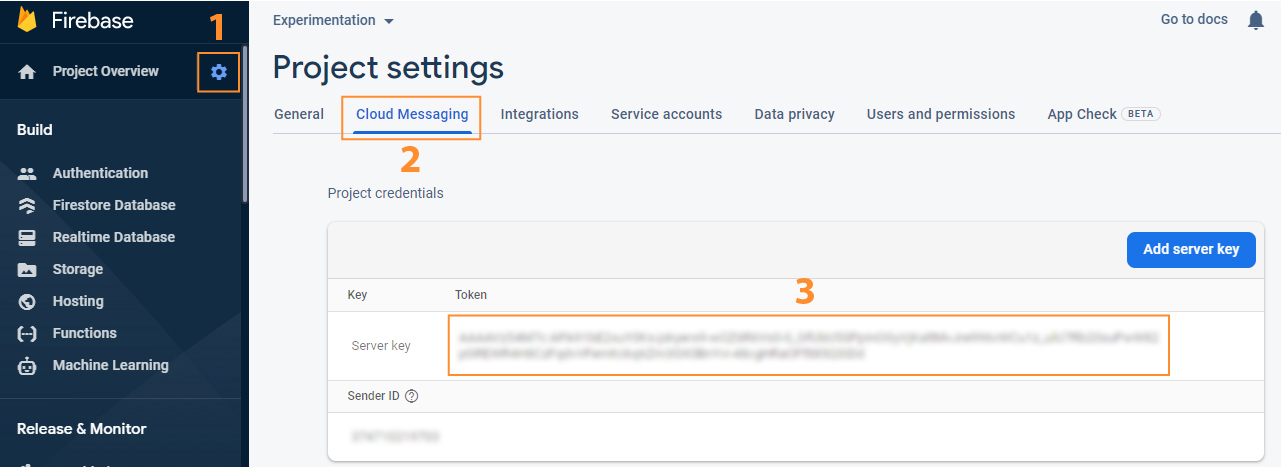
Go to Project Settings and copy your server key from the Cloud Messaging tab, as seen in the image below.

-
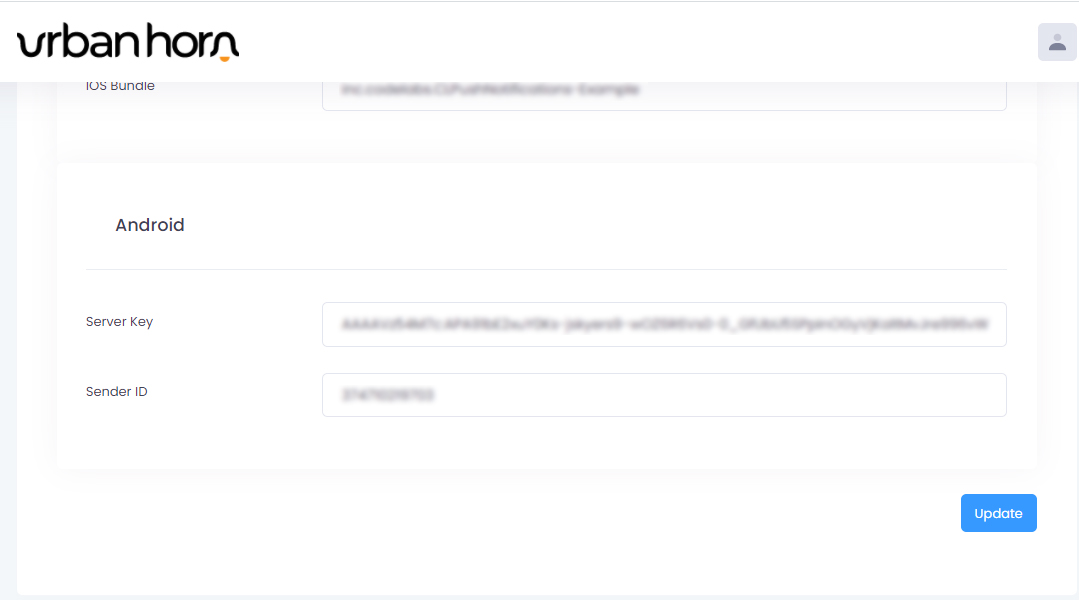
Navigate to the dashboard user profile after logging in to your UrbanHorn dashboard. Paste the copied server key into the "Server Key" field on the Android section and click submit.
Initialization
Initialize UrbanHorn SDK with your access key. Import UrbanHorn packages in your Application class. Please enter your access key in the code snippet provided below.
Java
As shown above, navigate to the user profile to find your access key.
Run your Application
Run your app on an Android device to ensure that your device is registered to notifications and that it can get messages from the UrbanHorn dashboard.
Congratulations!
You have now successfully integrated the UrbanHorn SDK with your Android app, and User session data is directly being sent to your dashboard. Please keep in mind that your data may take a few minutes to appear on the dashboard.
Troubleshooting:
1. How to ensure whether the integration is successful or not?
You can check the UrbanHorn SDK debug logs in Android Studio to see if the integration is successful. The message "UrbanHorn Successfully Initialized" will be logged if the integration is successful. Otherwise, "UrbanHorn Initialization Failed" with an error message will be logged.

Successful Integration logs

Unsuccessful Integration logs
2. Why aren't users displaying in the dashboard after SDK integration is successful?
- Make sure that UrbanHorn SDK is appropriately integrated.
- When you're integrating the SDK, make sure that you've entered the correct access key.
iPhone Operating System (iOS)
Getting Started:
1. SDK Installation
CocoaPods is the most convenient way to use UrbanHorn in your iOS project. Please make sure you're using Ruby 2.0.0 or higher before you proceed (To install the SDK, you don't need to know Ruby syntax.)
Step 1: Download CocoaPods
For Swift and Objective-C projects, CocoaPods is a dependency manager. The following command can be used to install CocoaPods.
Shell
Step 2: Add a Podfile
Navigate to your Xcode project directory in the terminal and enter the following command to create a Podfile.
Shell
Step 3: Edit your Podfile
Under your project's target, include the following in your Podfile. If you're using Xcode 10 or higher, you can use the following commands.
Ruby
Step 4: Install CLPushNotifications SDK
Go to your Xcode project directory and run the following command to install the CLPushNotifications SDK.
Shell
Step 5: Quit using YOUR-PROJECT-NAME.xcodeproj as your project file. From now on, use the YOUR-PROJECT-NAME.xcworkspace project workspace file created by CocoaPods.
This will ensure that the UrbanHorn SDK is loaded successfully.
2. SDK Initialization
Step 1:
Call UrbanHorn's application:didFinishLaunchingWithOptions: from the application:didFinishLaunchingWithOptions: of your AppDelegate.
- It's preferable if you make this call at the end of
didFinishLaunchingWithOptions: - If you want to manually register APNs for push notifications, use a different SDK, or set a delegate for in-app notification callbacks.Refer code snippet:
Push Messages
Push notifications, or messages that appear on mobile devices at any time, can be sent by app publishers even if the users aren't actively using the app or their devices.
Please ensure you have completed each step in Getting Started before continuing.
Push messaging of UrbanHorn can be integrated using Apple's Push Notification service. You must be enrolled in the Apple Developer Program to integrate UrbanHorn into your iOS application. You need to upload your APNs Auth Key or APN Certificate to send push alerts to your iOS users. It is recommended that you create and upload your APNs Auth Key for the following reasons:
- There is no need to keep track of multiple certificates for different apps because one auth key may be used for all of them.
- Once the push certificate has expired, there is no need to re-generate it every year.
If your app automatically supports push notifications, continue to the section below about uploading your auth key. Please keep in mind that you may still need to enable background modes.
1. Enable Push and Background Modes Capabilities
Follow these steps to get it done:
Step 1: Access the Project Navigator view.
Step 2: Select the Capabilities tab after selecting your main app target from the extended sidebar or dropdown menu.
Step 3: Click the switch to add the "Push Notifications" to access our app if it isn't already enabled. Make sure a YOUR-APP-NAME.entitlements file has been included in your project if you're using Xcode 8.
Step 4: If Background Modes is not enabled, click the switch and then select the Remote notifications option.
2. Create APNs Auth Key
The documentation below explains how to generate an APNs Auth Key to send push notifications to your users. To create an APNs Auth Key, follow these steps:
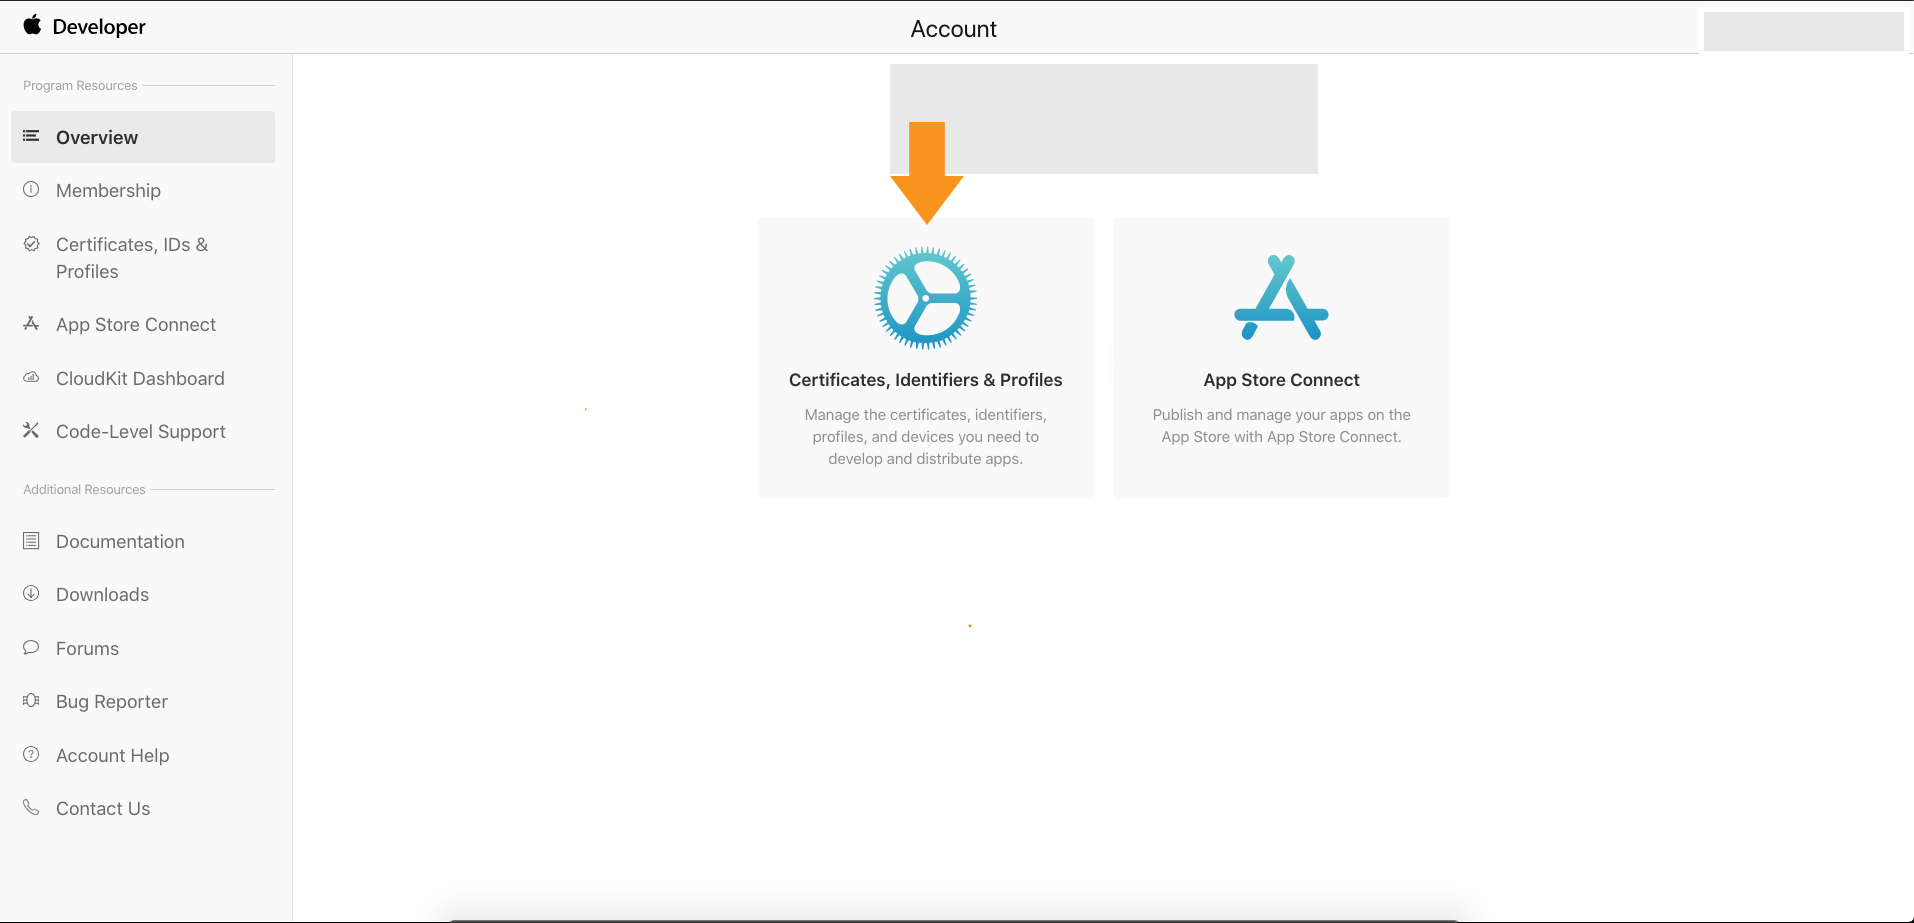
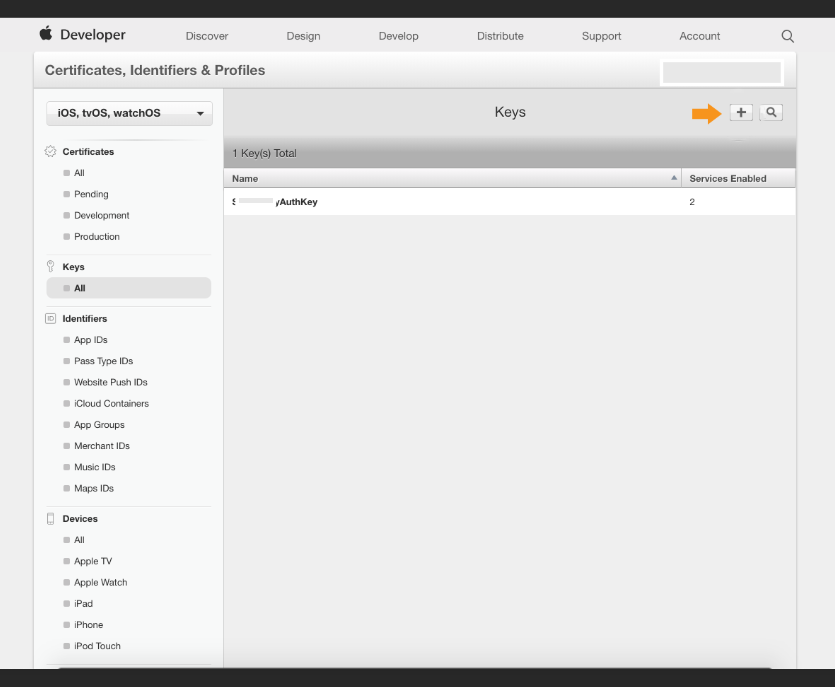
Step 1: Sign in to the Apple Developer Console and navigate to Certificates, Identifiers, and Profiles.
Step 2: By clicking the Add button in the top right corner, you can create a new Auth Key.
Step 3: Add a Key Name and select APNs.
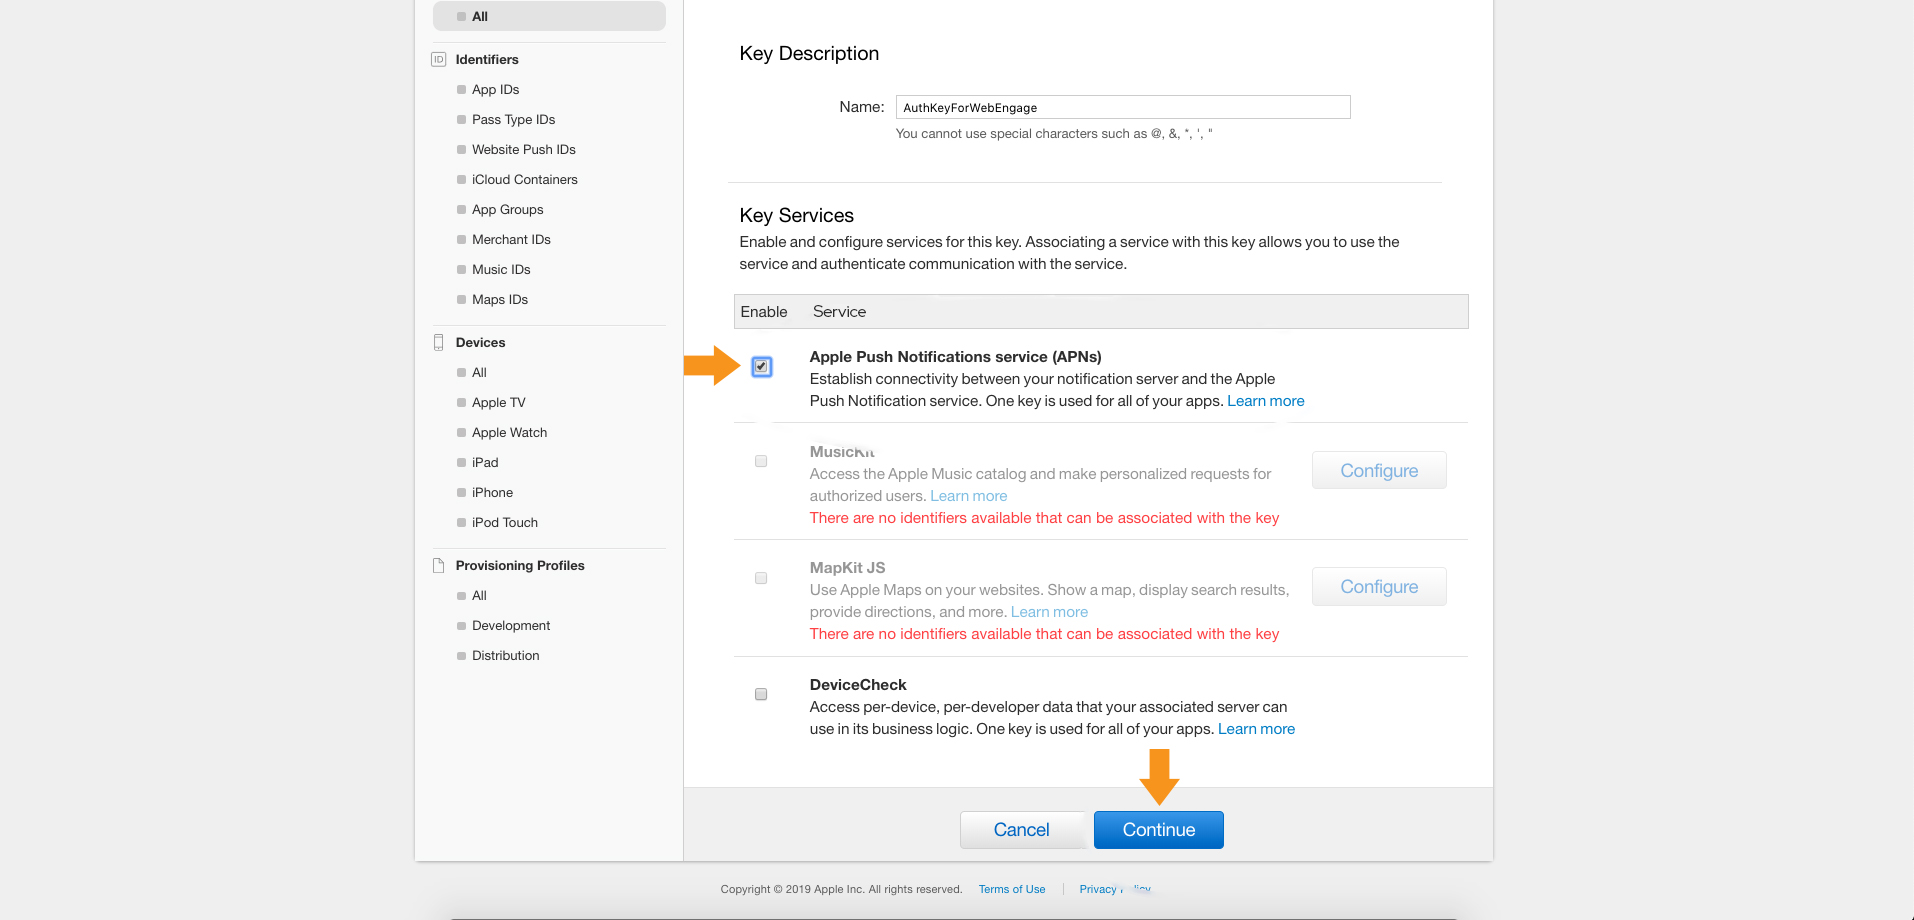
Step 4: Next, press the Confirm button.
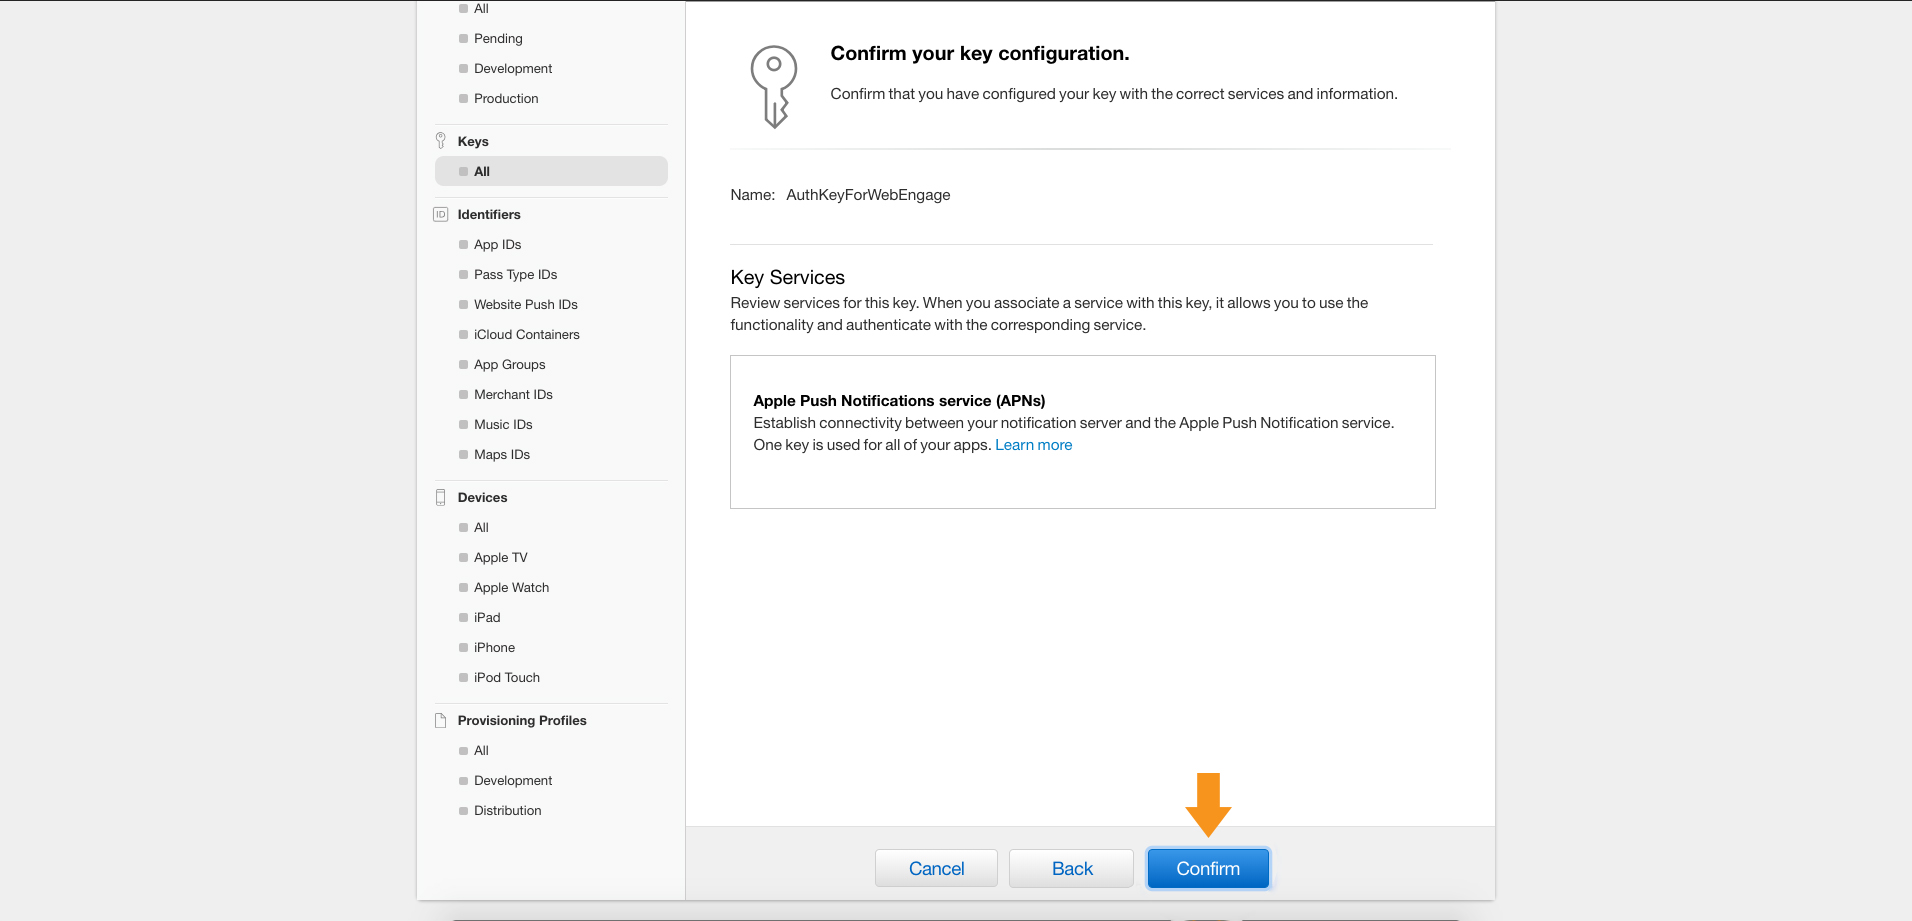
Step 5: You will be able to download your Auth Key file from this page. Please do not rename this file and upload it as is to the UrbanHorn dashboard, as stated in the section below.
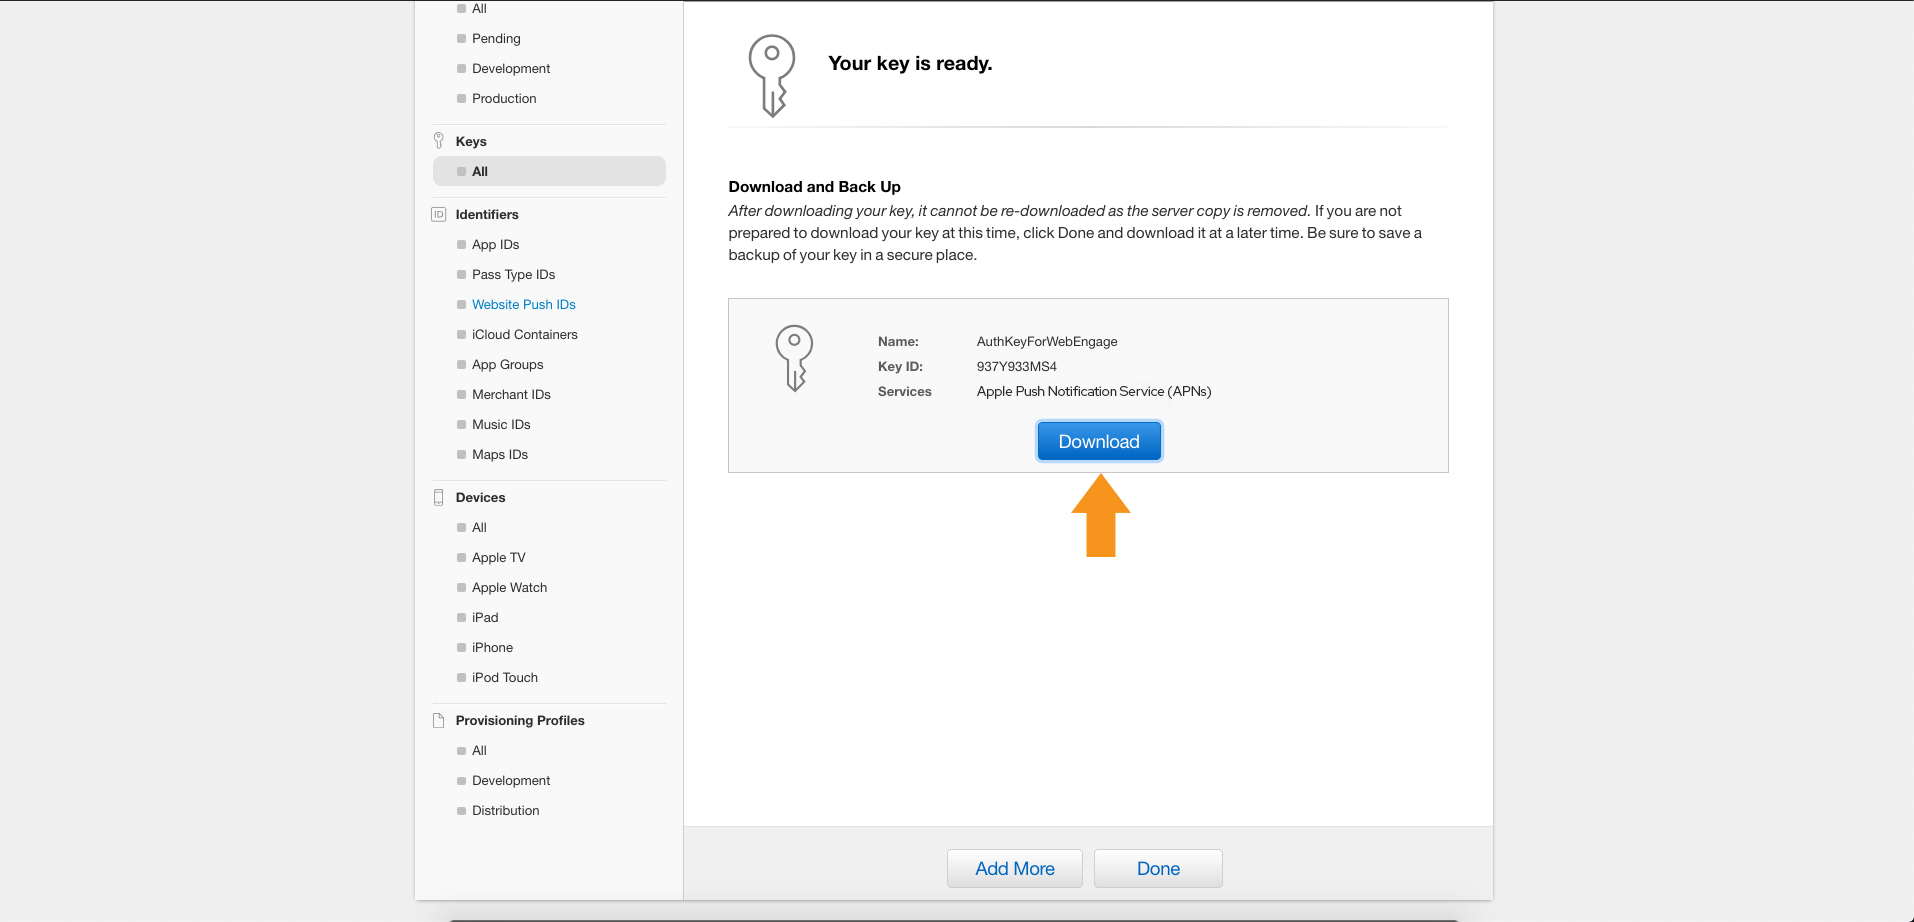
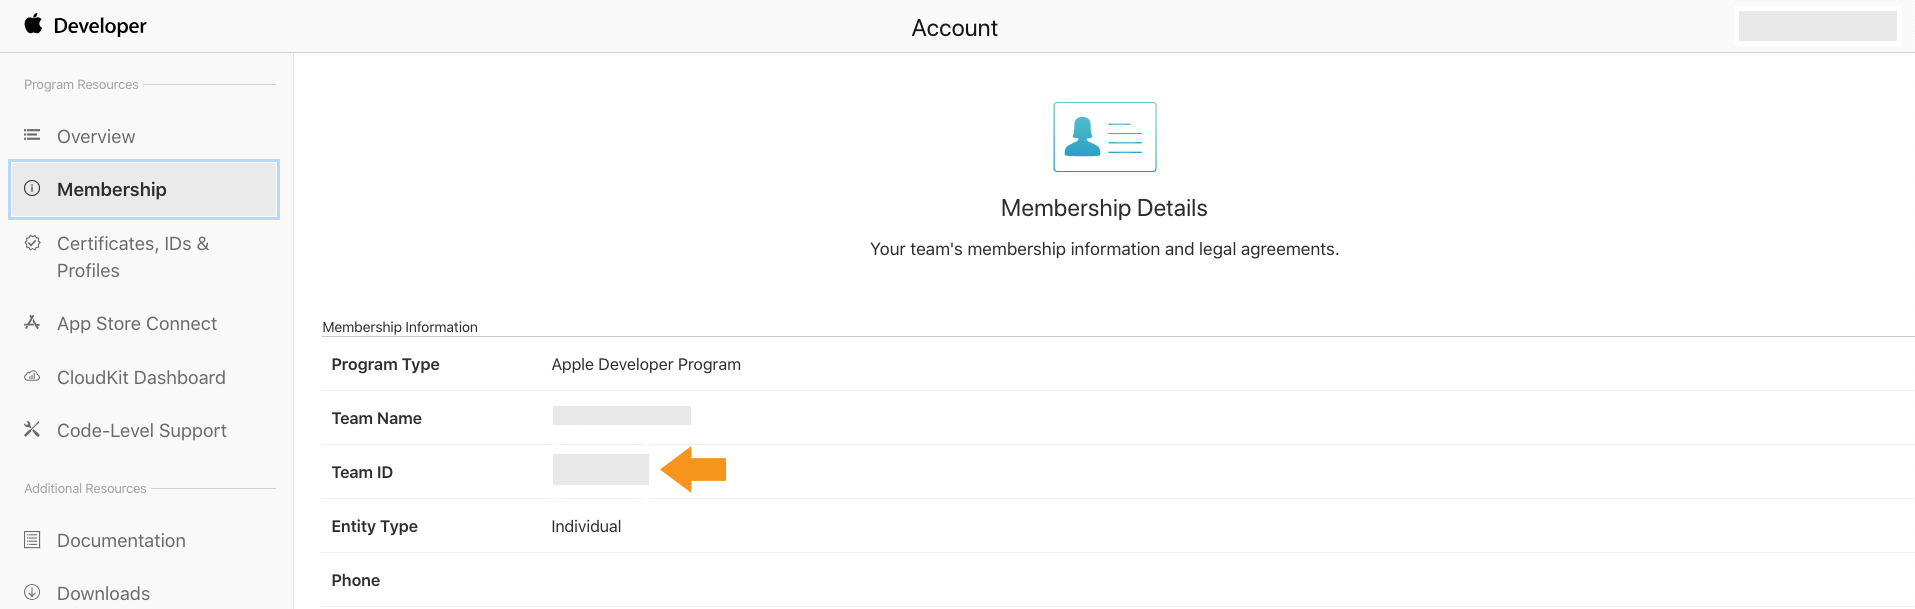
Step 6: Find and copy your Team ID. To do so, go to the top right corner and click on your name/company name, then select View Account.
3. Upload APNs Auth Key
To enable UrbanHorn to send push notifications to your users, you must upload the APNs Auth Key. The following steps will guide you through the process of uploading the APNs Auth Key to send push notifications to your users.
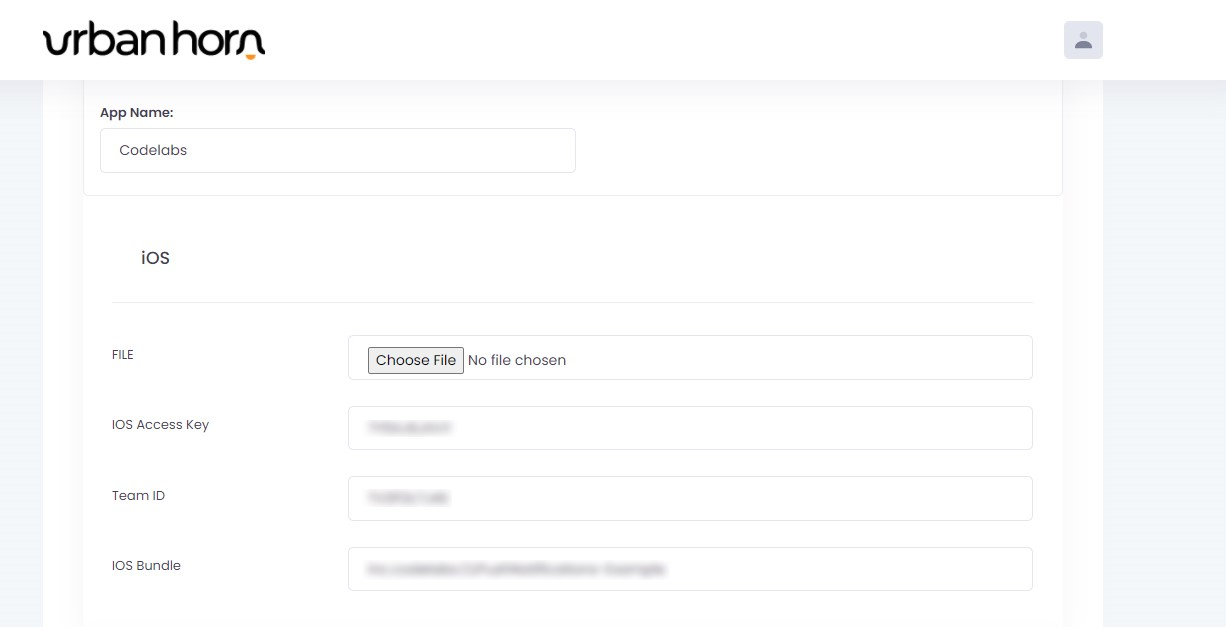
Step 1: Log in to your UrbanHorn dashboard and navigate to User Profile.
Step 2: In the iOs, section upload the APNs Auth Key file you downloaded earlier, paste your Team ID, iOs access key, and the Bundle ID of your app. In Xcode, you can find your app's Bundle ID and then click submit.
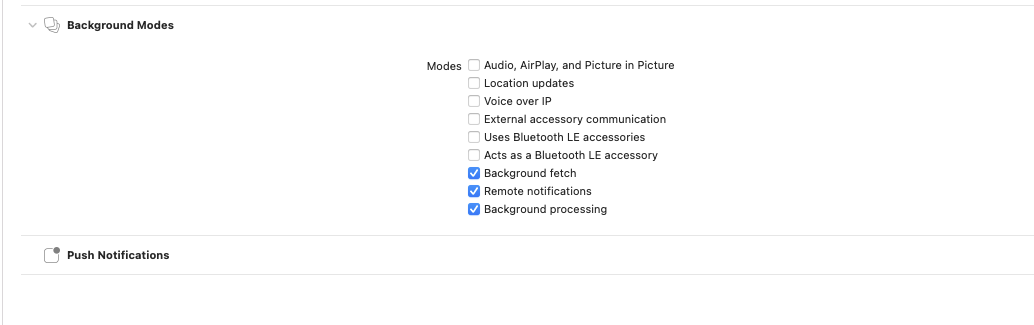
4. Configure Info.plist
Tick the following to enable the background modes of your project.
Run your Application
Run your app on an IOs device to ensure that your device is registered to notifications and that it can get messages from the UrbanHorn dashboard.
Congratulations!
You have now successfully integrated the UrbanHorn SDK with your iOs app, and User session data is directly sent to your dashboard. Please keep in mind that your data may take a few minutes to appear on the dashboard.
Troubleshooting
1. How to check the verification status?
Verify the logs by launching your app through Xcode. In the Xcode console, look for the log message "SDK Integration Verification complete."Your SDK integration is likely to be complete and correct if it occurs unless your configuration values are wrong.
2. Why aren't users displaying in the dashboard even after SDK integration is successful?
If this happens, make sure to review the following steps:
- Make sure you have successfully integrated UrbanHorn SDK into your app.
- Double-check your Access key in the Info.plist against the UrbanHorn dashboard.
Rest API
Getting Started:
We provide Rest API that offers endpoints with specific requirements that perform actions and return data.
User Authentication
A unique Access key is automatically created for each UrbanHorn Account. Your key acts as the authorization bearer token and must be passed in the header of each API call. The token is valid for the entire lifetime of an Account.
API Token
For instance, in the below code snippet, we’re calling the API-Token for sending the message. These targeting parameters are specified.
body
                    {

                        "accessKey": "49708285cea5f930cb628caaf4238818",

                        "title": "msg Title",

                        "message": "message description",

                        "field_name": "Field Name",

                        "value": "value "

                    }
headers
Api-Token = 23ab17***
Response Container
If a message is successfully sent, you will get a Success response.
If an error occurs in sending the message, you will get a Failed response.
Flutter
Getting Started
Google's Flutter is an open-source user interface software development kit. You could create apps for Android, iOS, Linux, Mac, Windows, Google Fuchsia, and the web from a single codebase. The Flutter SDK of UrbanHorn makes it easy to add push notifications to your app.
Following the instructions below, you can integrate the UrbanHorn SDK with your Flutter apps and ensures that your app runs smoothly.
Check out the UrbanHorn Overview Key Concepts page to better understand what the UrbanHorn SDK is all about.
Requirements:
The minimum requirements for UrbanHorn Flutter SDK are:
- iOS 10.2+
- Android 4.0.0+
- Flutter (minimum version 1.22.6+)
Installation:
Flutter should be installed to manage project dependencies. Use this package as a library to connect UrbanHorn to your app. Execute the following command with Flutter:
It adds a line like this to your package's pubspec.yaml ( and run an implicit dart pub get ):
Add the cl_pushnotifications into your project dependencies in pubspec.yaml file.
Your editor, on the other hand, might be in support of flutter pub get.
Import package in your dart code. You may use the following code.
Get Credentials:
- Before you begin, first register an UrbanHorn account. It only takes a few minutes, and you'll be able to utilize this account for your apps.
- For your app, set up the UrbanHorn SDK. For additional information, visit our installation page.
- Go to Dashboard>>user profile>>copy your Access key.
Configuration:
For Andriod:
Make sure to configure Firebase on Android by following these instructions: ( Firbase Messaging ).
For iOs:
Ensure that your app has been correctly configured to allow push notifications and that a certificate/token for sending pushes has been generated.
Add additional lines to the didFinishLaunchingWithOptions method in your iOS project's AppDelegate.m/AppDelegate.swift file.
Objective-C:
Swift:
As described above, add cl_pushnotifications as a dependency in your pubspec.yaml file.
Configure the push service using the createPushConnector() method. PushConnector is very similar to FirebaseMessaging. Therefore Firebase examples may be beneficial during implementation. You should create the connector as soon as possible to get the onLaunch callback working on closed app launches.
Build and test your solution on the device with Firebase Console and the NWPusher app.
For Additional APNs Features:
To display notifications,while in the foreground refer below code snippet:
Note: If the user taps your notification in the app’s background, a push will be provided via onResume without disconnecting the application. Please ensure that you handle the activity quickly and error-free, given how long it takes to execute applications running in the background.
Setting up FirebaseCore:
If you want to use firebase but not firebase messaging, include the following configuration entry in your Info.plist (to avoid a MissingPluginException):
Initialization:
To Set UrbanHorn authentication key.
To set attributes follow the following code snippet:
Media Rich Notification:
For Notification Service Extension:
A simplified Notification Service Extension class for integrating media attachments into iOS 10 rich push notifications.
With iOS 10, you can add media attachments (image, gif, video, and audio) to push notifications. To do this, this library provides a simple drop-in class.
In iOS 10, rich push notifications are enabled via a Notification Service Extension, and a separate binary integrated into your app bundle.
Require Steps for sending media-rich notifications:
- 1. Add a Notification Service Extension target to your app and configure it for Push.
- 2. In your main app, turn on push notifications.
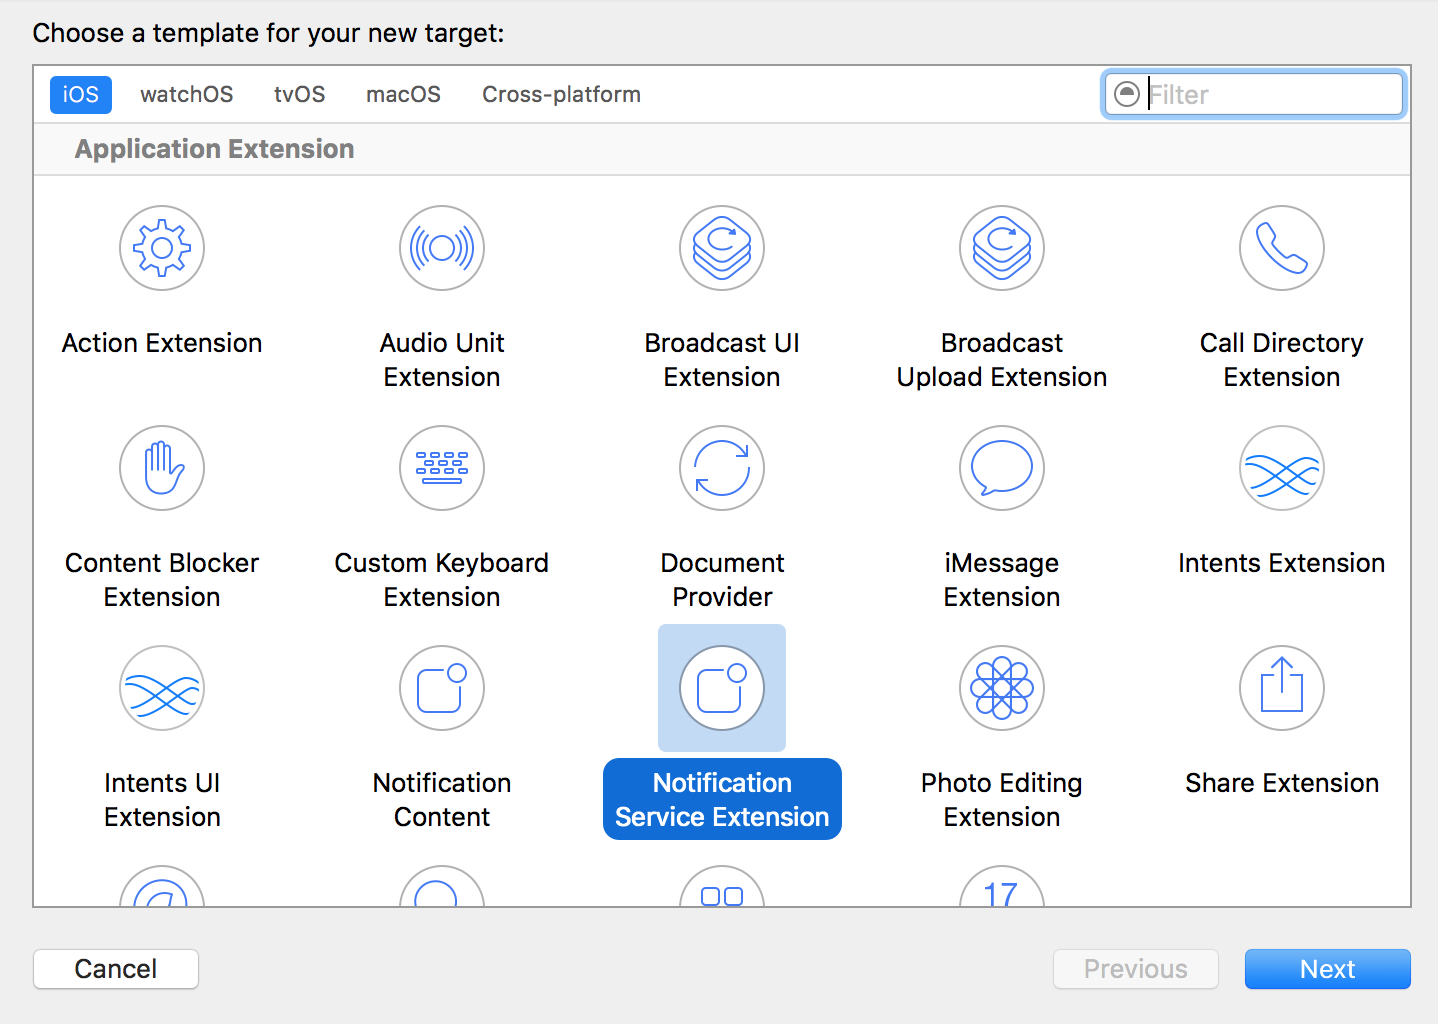
- 3. In your project, create a Notification Service Extension. To do so, go to File -> New -> Target in your Xcode project and choose the Notification Service Extension template.
For Swift:
In NotificationService.swift file follow the below mention code:
Troubleshooting:
1. Make sure you're testing on an actual device. NOTE: From 11.4 forward, this may not be necessary:
simulating remote push otifications
2. Add error logging to your AppDelegate if the onToken method isn't being called, as seen in the code below.push notifications connect your device to the Console app for macOS and execute your program. In the logs, look for the string "PUSH registration failed." The error notice will inform you about the problem.
swift
objc
3. If the error "shared' is not available in iOS application extensions,' use view controller-based solutions instead.' 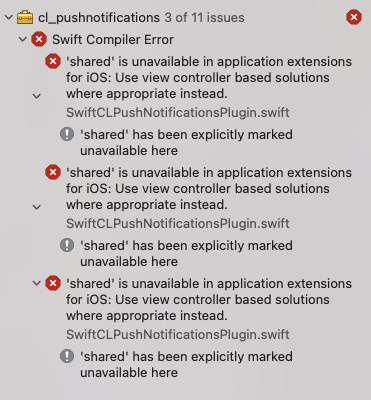
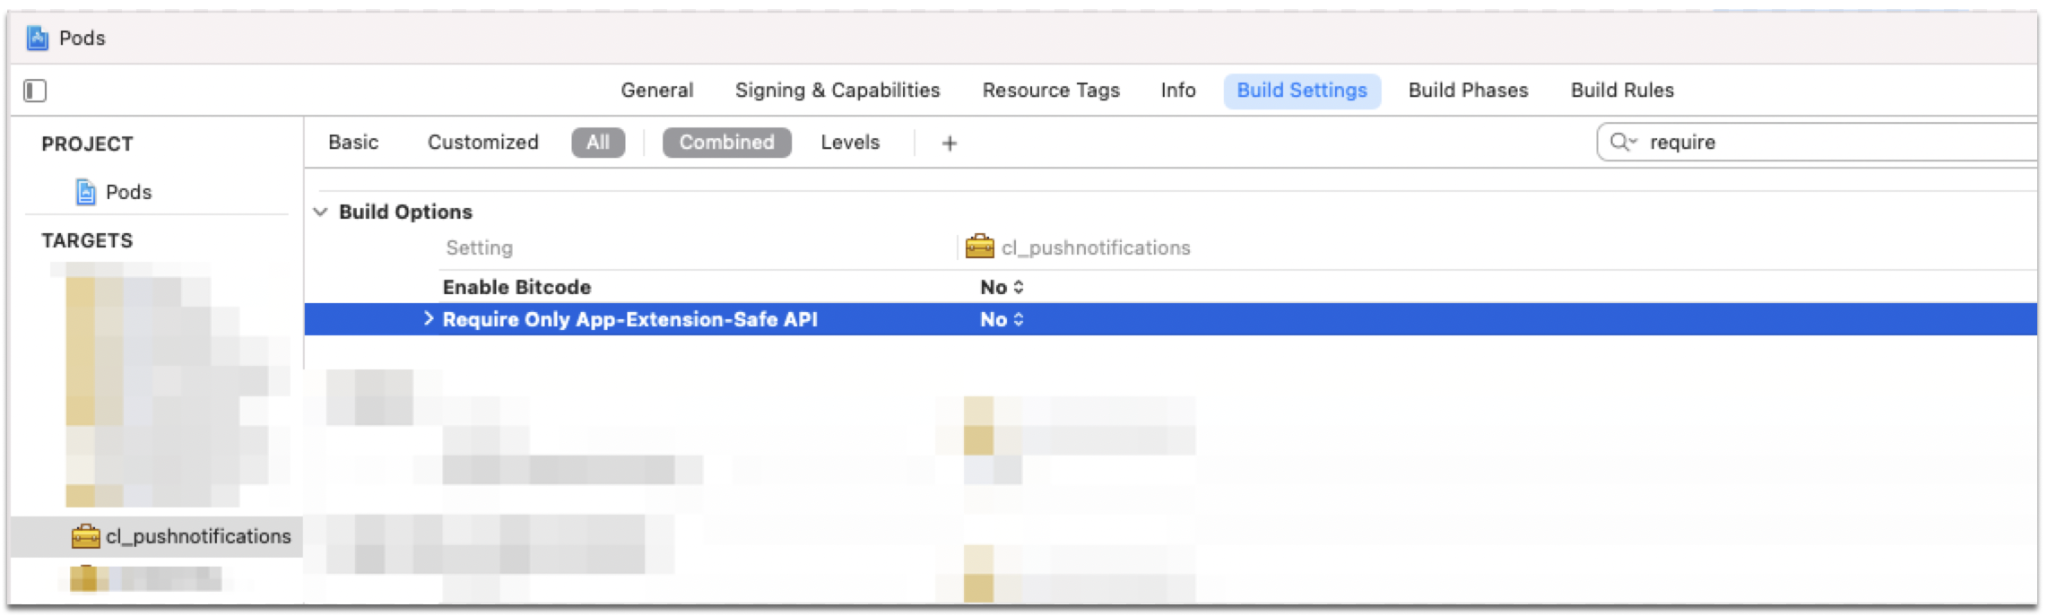
Now, in the Pods Project, select the cl pushnotifications Pod, and under the Build Settings -> Build Options, change the ‘Require Only App-Extension-Safe API' setting from ‘Yes' to ‘No.